Iteration 1
Overview
Vision Statement
Provide a web-based user interface that allows service providers (such as dance instructors, personal trainers, massage therapists, tutors) to record the periods of time during which they can book clients. The interface, in turn, allows clients to book time periods, and to cancel time periods based on the service agreement’s rules (which are specified by the service provider). The goal of the web interface is to allow business to be conducted digitally to save both parties time in the booking process.
Feature list
- The service provider shall have a configuration view.
- The service provider shall have a calendar view.
- The configuration view and calendar view do not need to be separate.
- The service provider shall be able to create free time slots.
- The service provider shall be able to delete free time slots.
- The service provider shall be able to create free time slots for multiple customers per unique time slot (e.g. group time slots).
- The service provider shall be able to cancel booked time slots.
- A service provider is not required to enter a service agreement.
- Upon log in, the service provider shall view the calendar starting on the first non- past time range containing booked time slots, or the current date’s time range if there are no booked time slots. A time range consists of one week.
- [Optional] The service provider may page back in time to view his/her past bookings.
- The service provider may page forward in time across time ranges to view/create free/booked time slots.
- The service provider shall log in.
- The service provider shall be able to create/register and unregister user accounts.
- A service provider shall be able to see the total training hours per week or overall with a user.
- A service provider shall have a way to enter search categories to allow customers to find him/her: name, location, service. A service provider may leave these blank.
- A service provider may select a private or a public state. In a private state, the service provider may be searched and viewed by users, but users may not register themselves with the service provider (which allows them to book time slots). In a public state, users may register themselves.
- A private service provider may view a list of registration requests from users.
- The user shall have a calendar view.
- A user shall be unable to select a non-free time slot booked by another user.
- [Optional] Such time slots are invisible to the user.
- A user shall be able to select any free time slot.
- A user shall be able to book any free time slot.
- Any free time slot selected by a user for booking may become non-free before booking if another user books it.
- A user shall be unable to book any non-free time slot.
- Either before, or as a result of, requesting to book, the user shall receive a notification for every time slot that is selected and which is no longer free, informing the user that booking will fail on each. [Optional] The notification may list the remaining selected timeslot(s) (if any), and ask the user if he/she still wishes to book them.
- A user may book multiple timeslots.
- [Optional] A user may book multiple timeslots in a single booking event.
- A user shall have to log in.
- Upon log in, the user shall view the calendar starting on the first time range containing booked time slots with the user, or the first time range containing free time slots if the user has no booked time slots. An applicable time range consists of one week.
- [Optional] The user may page back in time to view his/her past bookings.
- The user may page forward in time across time ranges to view/select free time slots.
- A user shall be able to see the total training hours per week or overall with a service provider. These features do not yet have a GUIsketch.
- A user shall be able to select a service provider from a list of service providers with which the user has been registered. These features do not yet have a GUIsketch.
- Each calendar viewed by the user is specific to the selected service provider.
- A user shall have a way to search for service providers by categories: name, location, service. These features do not yet have a GUIsketch.
- A nonblocked user may find and book with a “public” service provider. Other users may find a “private” service provider, and request to be made “trusted”; only “trusted” users may book with “private” service providers. These features do not yet have a GUIsketch.
GUI sketches
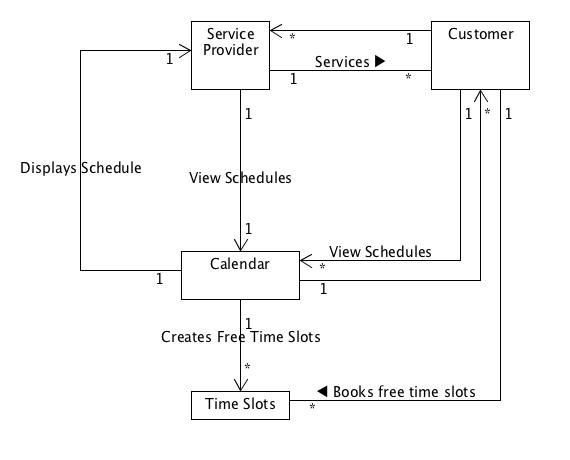
Domain model

Actors
Primary Actor
Service Provider
Runs business and schedules appointments with customers.
Secondary Actor
Customer
Uses services provided by the Service Provider through scheduled time slots in their calendar.
Database
Stores all system information.
Use-cases
UML activity diagram
Use-case list
Provider Signs Up
1. Provider visits web page to sign up
2. Web page provides an overview of services, including a Sign Up Now section
3. Provider enters Name, Email, and Desired Password
4. Provider hits Sign Up as Provider
5. Web page redirects Provider to a Thank You for Signing Up page
6. Web page says that a verification email has been sent
7. Provider checks email; finds and clicks link
8. Provider is redirected to their Dashboard
Provider Logs In
1. Provider visits web page to log in
2. Web page provides an overview of services, including a Log In section
3. Provider enters email and password
4. Provider hits Log In
5. Provider is brought to Dashboard
Provider Configures Their Business
1. Provider logs in
2. Web page displays Provider's Dashboard
3. Customer enters Business Name, Business Location, Business Description, and
   checks "By Default, All Customers Have Permission to Reserve" if desired.
4. Provider hits Update
Provider Invites Customer to Join the Scheduling System
1. Provider logs in
2. Web page displays Provider's Dashboard, which contains an Invite or
   Remove Customer section
3. Provider clicks Invite Customer
4. Web page pops up small dialogue asking for Customer's Name and Email, and
   asking for (optional) message to customer
5. Provider enters information and clicks Invite Customer
6. Email is sent to Customer
Provider Removes Customer from Scheduling System
1. Provider logs in
2. Web page displays Provider's Dashboard, which contains an Invite or Remove
   Customer section
3. Provider clicks Remove Customer
4. Web page pops up small dialogue with a list of Customer names and emails
5. Provider selects a customer
6. Provider clicks Remove Customer
7. Reservation Permission is taken away from Customer
8. Email is sent to Customer
Provider Responds to Customer’s Reservation Permission Request
1. Provider receives email asking to join Provider's scheduling system

2. Provider clicks Accept or Decline link

2.1. Provider clicks Accept link
2.2. Customer is given Reservation Permission

2.1.1 Provider clicks Decline link
2.1.2. Customer is not given Reservation Permission

3. Provider is taken to a confirmation page
4. Customer is notified via email
Provider Adds Free Time Slot(s) to Schedule
1. Provider logs in
2. Web page displays Provider's Dashboard, which contains the Calendar
3. Provider drags over an empty area on the Calendar
4. Web page pops up two options, Create Free Time Slot and Reserve for Customer,
   along with small checkboxes for every M, T, W, Th, F, Week, Month, and along
   with a Maximum Customer Occupancy entry (which defaults to 1).
5. Provider clicks appropriate checkboxes, sets Maximum Occupancy, and then
   clicks Create Free Time Slot
6. Pop up closes
7. Updated calendar is now displayed in the Provider's Dashboard
Provider Removes All or Part of Free Time Slot(s) from Schedule
1. Provider logs in
2. Web page displays Provider's Dashboard, which contains the Calendar
3. Provider indicates that they'd like to remove a Free Time Slot

3.1. Provider clicks on a Free Time Slot

3.1.1. Provider drags over all or part of an existing Free Time Slot

4. Web page pops up two options, Reserve for Customer(s) and Remove,
   along with small checkboxes for every M, T, W, Th, F, Week, Month
5. Provider clicks appropriate checkboxes and then clicks Remove
6. Pop up closes
7. Updated calendar is now displayed to Provider on the Dashboard
Provider Schedules Appointment(s) For Customer(s)
1. Provider logs in
2. Web page displays Provider's Dashboard, which contains the Calendar
3. Provider indicates that they'd like to reserve a Time Slot for Customer(s)

3.1. Provider drags over all or part of a Free Time Slot on the Calendar
3.2. Web page pops up two options, Reserve for Customer(s) and Remove

3.1.1. Provider drags over an empty area on the Calendar
3.1.2. Web page pops up two options, Create Free Time Slot and Reserve for
   Customer(s)

4. Provider clicks Reserve for Customer(s)
5. Web page displays pop up with a dropdown list of Customer names and emails
   and a Reserve and Notify button, along with small checkboxes for every
   M, T, W, Th, F, Week, Month, and along with a Maximum Customer Occupancy
   entry (which defaults to 1)
6. Provider clicks Customer(s)
7. Maximum Occupancy updates

7.1. Number of clicked Customers does not exceed Maximum Occupancy, and
     Maximum Occupancy therefore stays the same

7.1.1. Number of clicked Customers exceeds Maximum Occupancy, in which case
       Maximum Occupancy is set to be the number of clicked Customers

8. Provider clicks any applicable recurring checkboxes
9. Provider hits Reserve and Notify
10. Email is sent to Customer, notifying them of the Reservation(s)
11. Updated Calendar is displayed to Provider on the Dashboard
Provider Removes All or Part of Reserved Time Slot(s)
1. Provider logs in
2. Web page displays Provider's Dashboard, which contains the Calendar
3. Provider drags over all or part of a Reserved Time Slot on the Calendar
4. Web page pops up options, which includes the two options 1) Change to Free
   Time Slot and Notify and 2) Remove and Notify
5. Provider indicates how they'd like to remove the Reservation

5.1. Provider clicks appropriate recurring checkboxes and then clicks Change
     to Free Slot and Notify
5.2. Selected area(s) change to a Free Slot

5.1.1. Provider clicks appropriate recurring checkboxes and then clicks
       Remove and Notify
5.1.2. Selected area(s) are removed

6. Email is sent to Customer(s), notifying them of the change

6.1. Customer(s) are emailed details of modified appointment

6.1.1. Customer(s) are emailed notification of appointment cancellation

7. Updated Calendar is displayed to Provider on the Dashboard
Customer Accepts Invitation to Join the Scheduling System
1. Customer receives email asking to join Provider's scheduling system
2. Customer clicks Accept link
3. Web page asks to confirm Name and asks for desired password
4. Customer confirms Name and enters desired password
5. Customer clicks Done
6. Reservation Permission is given to Customer
7. Web page redirects customer to Customer's Dashboard, which includes
   Provider's calendar
Customer Declines Invitation to Join the Scheduling System
1. Customer receives email asking to join Provider's scheduling system
2. Customer clicks Decline link
3. Provider is notified that Customer declined via email
3. Customer is redirected to a friendly We're Sorry You Don't Want to Join
   page
Customer Logs In to Provider-Specific Web Page
1. Customer visits Provider-specific web page to log in
2. Web page provides Business Name, Business Description, and Business Location,
   along with a Log In section
3. Customer enters email and password
4. Customer hits Log In
5. Customer is brought to Customer's Dashboard
6. Web page displays Provider's Calendar
Customer Signs Up Without Being Invited by a Provider
1. Customer visits web page to sign up
2. Web page provides an overview of services, including a Sign Up Now section
3. Customer enters Name, Email, and Desired Password
4. Provider hits Sign Up as Customer
5. Web page redirects Customer to a Thank You for Signing Up page
6. Web page says that a verification email has been sent
7. Customer checks email; finds and clicks link
8. Customer is redirected to their Dashboard
Customer Logs In to Main Web Page
1. Customer visits web page to log in
2. Web page provides an overview of services, including a Log In section
3. Customer enters email and password
4. Customer hits Log In
5. Customer is brought to Dashboard
Customer Searches for Providers
1. Customer logs in to Main Web Page
2. Customer is brought to Dashboard, which has a Search section
3. Customer enters Business Name, Description, and/or Location
4. Customer hits Search
5. Customer is redirected to a new page with search results
Customer with Reservation Permission Reserves Appointment(s) with Provider
1. Customer logs in
2. Web page displays Customer Dashboard, which includes Provider's Calendar
3. Customer drags over all or part of a Free Time Slot on the Calendar. (Free
   Time Slots only show to Customers as free is they aren't already filled up.)
4. Web page pops up one option, Reserve, along with small checkboxes for every
   M, T, W, Th, F, Week, Month
5. Customer clicks appropriate recurring checkboxes and then clicks Reserve
   (Customer can only click Reserve if Provider has appropriate Free Time Slots)
6. Email is sent to Provider, notifying them of the Reservation
7. Updated Provider Calendar is displayed to Customer on Dashboard
Customer without Reservation Permission Tries to Reserves Appointment(s) with Provider
1. Customer logs in
2. Web page displays Customer Dashboard, which includes Provider's Calendar
3. Web page does not let Customer interact with Calendar
4. Customer hits Request Reservation Permission from Provider button
Customer Removes All or Part of Appointment(s) With Provider
1. Customer logs in
2. Web page displays Customer Dashboard, which includes Provider's Calendar
3. Customer drags over all or part of a Reserved Time Slot on the Calendar
   (Customer can only drag over their own appointments)
4. Web page pops up one option, Remove, along with small checkboxes for every
   M, T, W, Th, F, Week, Month
5. Customer clicks appropriate recurring checkboxes and clicks Remove
6. Selected area(s) change to Free Time Slots
7. Email is sent to Provider, notifying them of the change

7.1. Provider is emailed details of modified appointment(s)

7.1.1. Provider is emailed notification of appointment cancellation(s)

8. Updated Calendar is displayed to Provider on the Dashboard
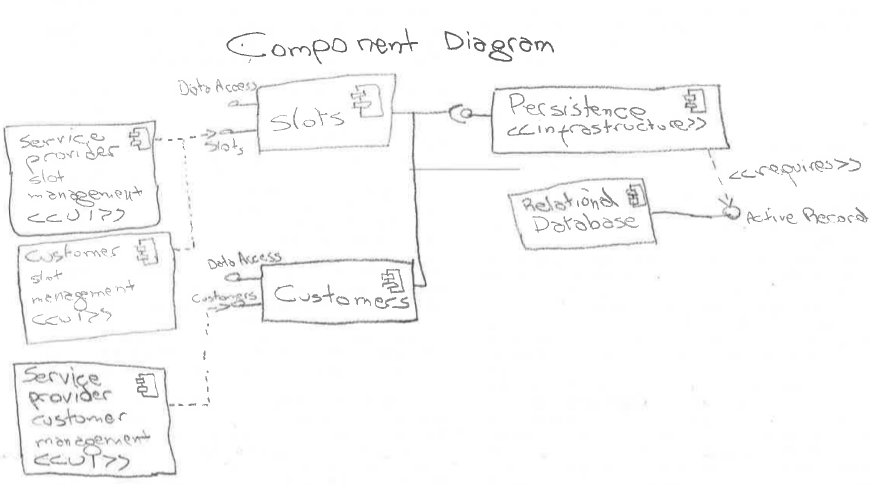
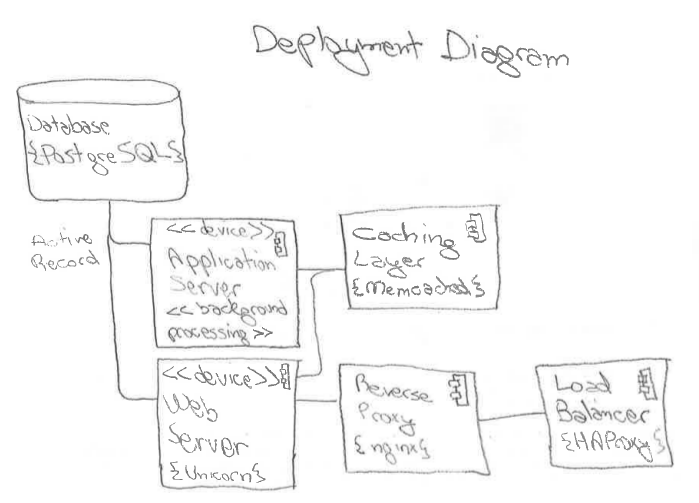
Architecture
- Ruby on Rails on the server side.
- JavaScript on the client side.


