Vision Statement
Our goal is to develop a mobile application named "Never Eat Alone," which allows the users to post invitations(Meal Notification) to invite others to have meals together. The users can add contacts, see which contacts are available and choose to post the invitation to a sub group of contacts (Receivers). These receivers can choose to accept, decline or ignore the invitation, and if they accept it, they can invite their contacts that are not in the poster’s contact list. This app will also feature data analysis like ranking and recommending restaurants based on the preferences of contacts, recommending contacts foron restaurant and geometrical information, etc. We will first focus on the Android platform, and if time allows, we'll extend it to a cross platform app using Java with RoboVM.
Core Features
User Management Features
- The ability to create user accounts : email, username and password is required. Username is unique and changed. Optional fields include name, gender, workplace and avatar.
- The ability to delete user accounts.
- The ability to login and logout of user account.
- The ability to insert and modify account information: password, email, availability status (see below), visibility list (See below).
- The ability to recover a forgotten password.
- The ability to add contacts - by inputting the userId or email address of the contact.
- The ability to delete contacts.
- The ability to separate contacts into groups (friends,family etc.).
- The ability to set availability status -- A Status that represents whether the user wishes to recieve notifications.
- The ability to modify visibility list -- The list that
controls
which contacts of the user can see
the user's availability status when enabled(i.e. set to "available"). It is a subset of the user's contacts. - The ability to set availability status at repeated intervals -- The status could be set to available from 3-4 pm every Monday, Wednesday, Friday.
User/Meal Notification Management Features
- The ability to post meal notifications -- sent to contacts based on above visibility list.
- The ability to recieve meal notifications -- from contacts to whom the user is available (Determined by availability and visibility as noted above).
- The ability to close meal notifications.
- The ability to set the location of the meal (Look at geo location features below) -- This CAN BE a custom location (someone's house for example).
- The ability to set a duration (optional start and end time) for meal notification -- A user may be open for breakfast for two hours from current time OR the user says he/she can have breakfast between 8-10 a.m.
- The ability to set a deffered meal notification post time -- The user can choose when the notification is posted (perhaps at a later time or date).
- The ability to set maximum size of meal party.
- The ability to set whether meal is open to extended contacts -- allows friends of friends to join in.
- The ability to add a custom message or additonal information.
- The ability to add a list of recipients for meal notification -- Subset of user's contacts.
- The ability to add a contact who is currently unavailable.
Meal Notification Push Features
- The ability to push notification to all contacts that are recipients of the meal notification and are currently available to the poster orbecome available to the poster before the notification expires or is closed manually by the poster.
- The ability to push "open spots" status -- As people accept, other contacts to whom the notification was sent should be informed that the number of available spots for the notification are decreasing.
- The ability to push the names of contacts of the recipent of the post that have accepted the notification -- If a friend of one of the invitees accepts, the invitee should be notified that said friend is attending ( Since this might affect the decision of the invitee).
- The ability to push a "notification closed" message to notify contacts that the poster is no longer accepting replies.
- The ability to inform (via push) the poster of the notification of which contacts have accepted and when the notification is closed.
Geolocation Features
- The ability to automatically find address of restaurant -- If poster type's subway, the address "Subway restaurant, xyz Street, ..." should automatically be filled in.
- The ability to tag custom locations -- If poster types his/her address, then the app should remember the address for future reference.
Extended Features
- User/Restaurant Rank
Management
Features
- The ability to give a restaurant a star rating (1-5 scale).
- The ability to favorite a restaurant.
- Meal Notification Content and Push
- The ability to recommend a restaurant -- one of the recipients can recommend a restaurant if the location is unspecified.
- Geolocation Features
- The ability to search for restaurants based on proximity.
- Predictive Features
- The ability to recommend restaurants that are liked by majority users in the area (Uses Geolocation).
- The ability randomly recommend a restaurant (Should pick from restaurants that have decent ratings).
- The ability to recommend friends for meal at a particular restaurants -- uses contact's ratings for that restaurant.
- The ability to recommend restaurants for meal with a particular group of friends -- uses common restaurants that are ranked high by the group in question.
Actors
- User: All users of this application. In an invitation event, they can take one of the following roles:
- Poster: The user who post a invitation to friends
- Reciever: The user who receive the invitation
- Database: Where all the user information and restaurant information are stored
- Server: Manages the accounts and analyze the data
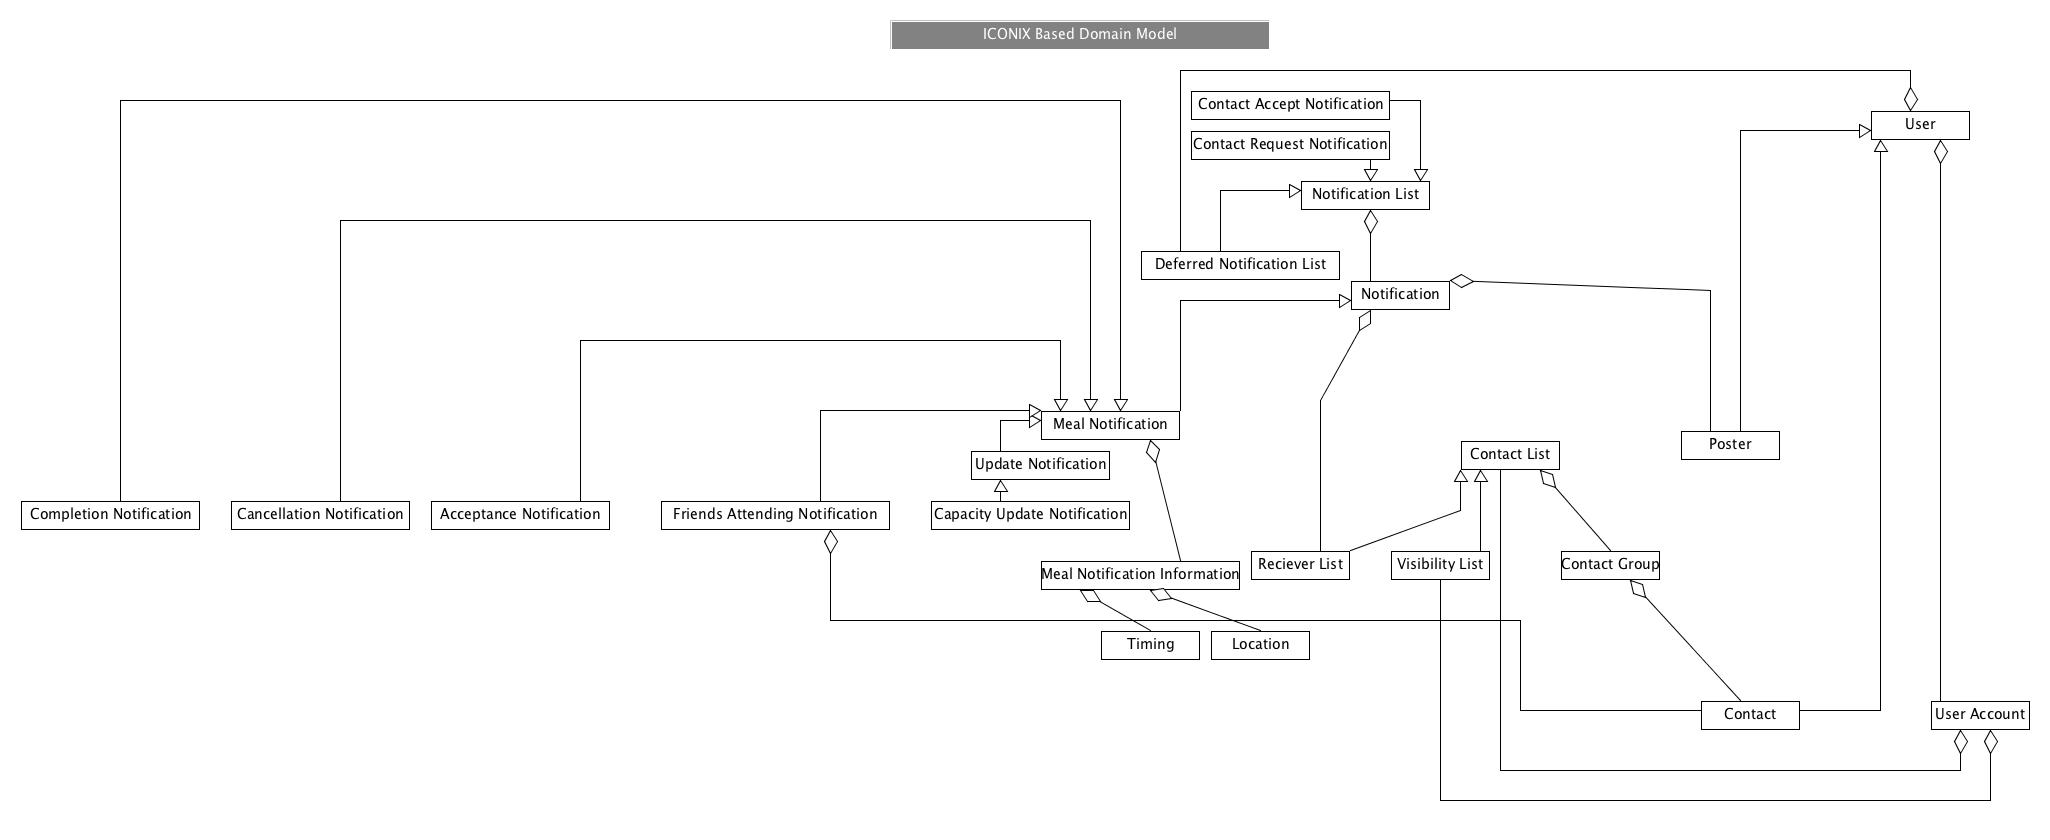
Domain Model
GUI Sketches
Download the interactive pdf here.

Use-Cases
Use-Cases for Creating and Deleting Accounts
Creating an account
Primary Actor: Tthe User)
Second Actor: Server
Goal: Creating an account
Pre-condition: User has open the application
Main Path:
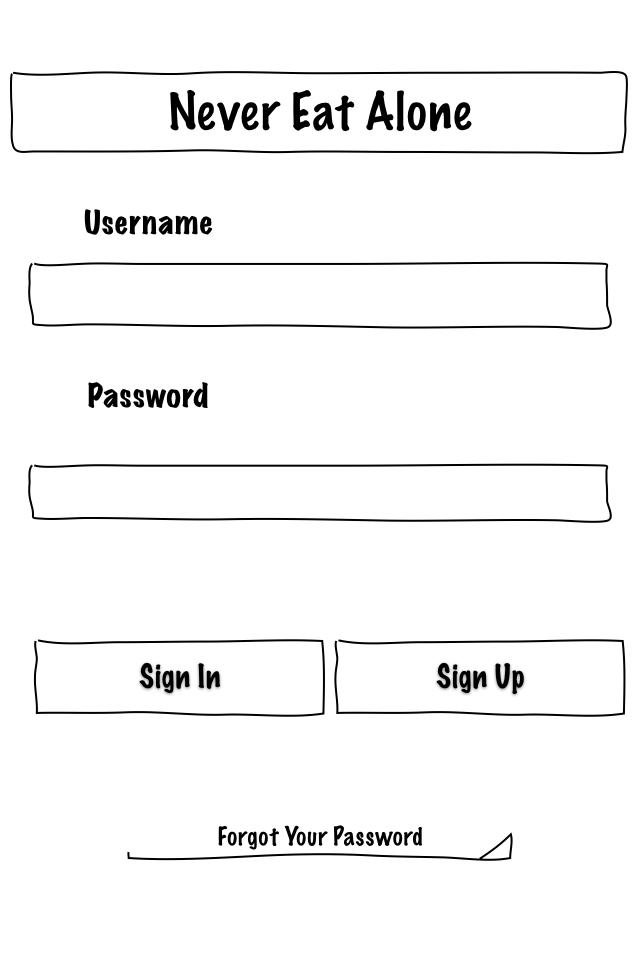
- User press the “Sign Up” button in the log in screen
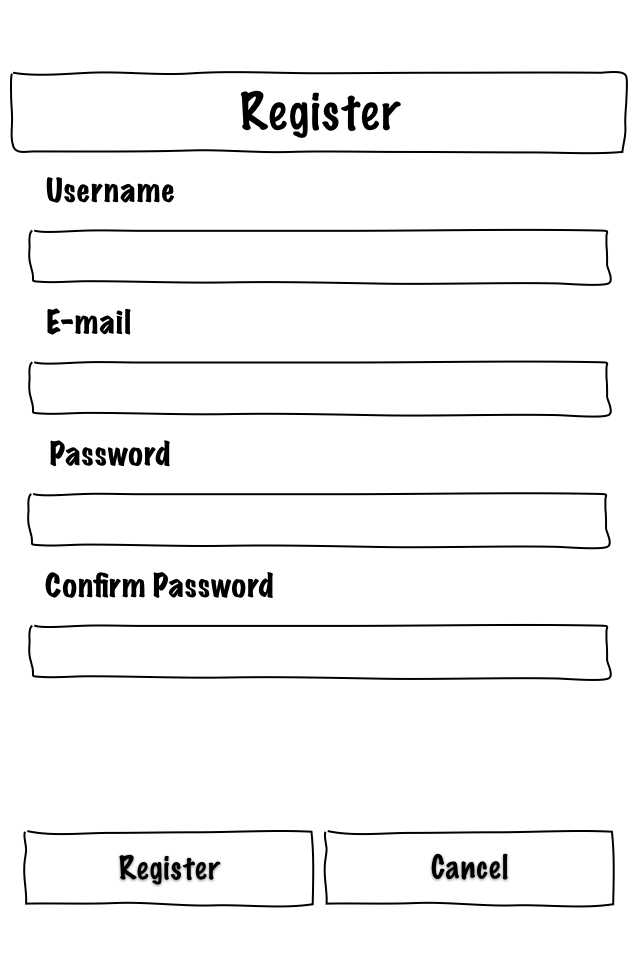
- The app turns to Register screen
- User types in the username for new account in the textbox label “Username”
- User types in email address for new account in the textbox labeled “E-mail”
- User types in password for the new account in the textbox labeled “Password”
- User types in password again in the textbox labeled “Confirm Password”
- User presses “Register” button
- A new account is created in the server and a confirmation email is sent to the new user’s email address
- User presses “Cancel” button
- The account creation procedure is cancelled
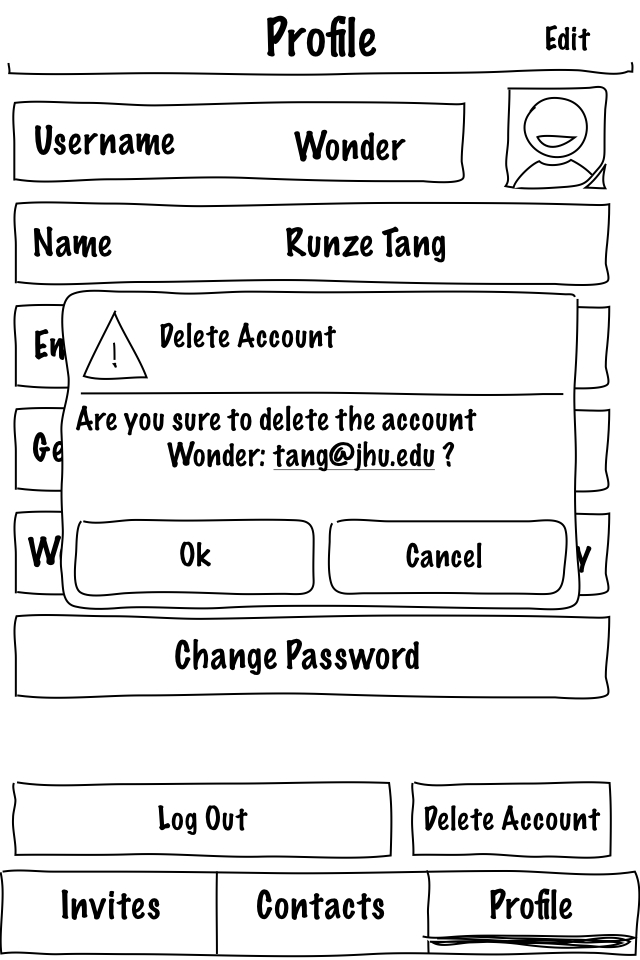
Deleting an account
Primary Actor: User
Second Actor: Server
Goal: Deleting an account
Pre-condition: User has entered the profile screen in the app
Main Path:
- User presses the button labeled “Delete Account”
- A confirmation window pops up showing “Are you sure to delete the account Username: EmailAddress?”
- User presses “OK” button in the confirmation window
- This account is deleted from the server
- User presses “Cancel” button in the confirmation window
- This account is kept in the server
- The pop up window disappears and the User stays in the profile screen
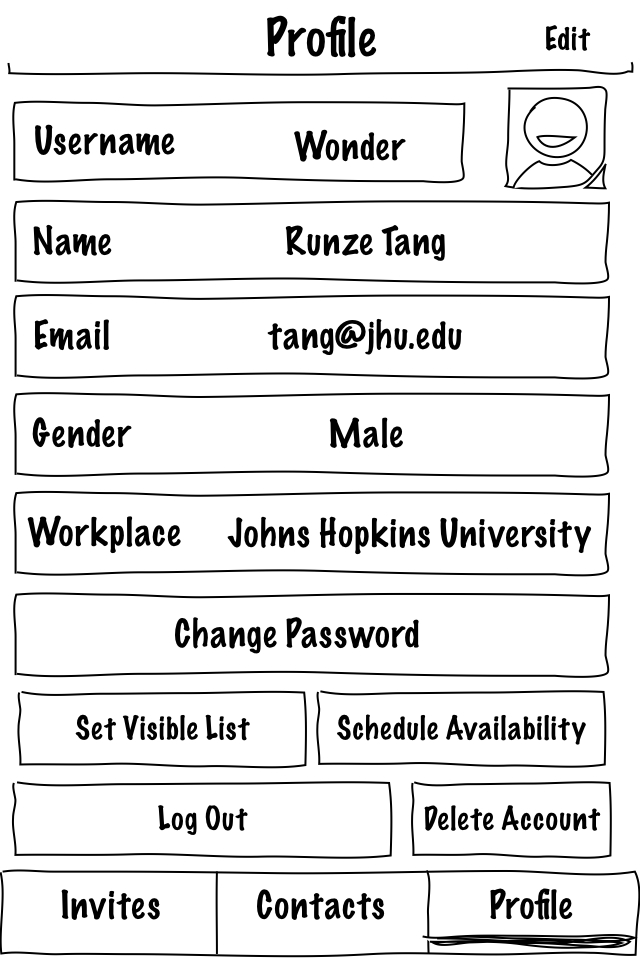
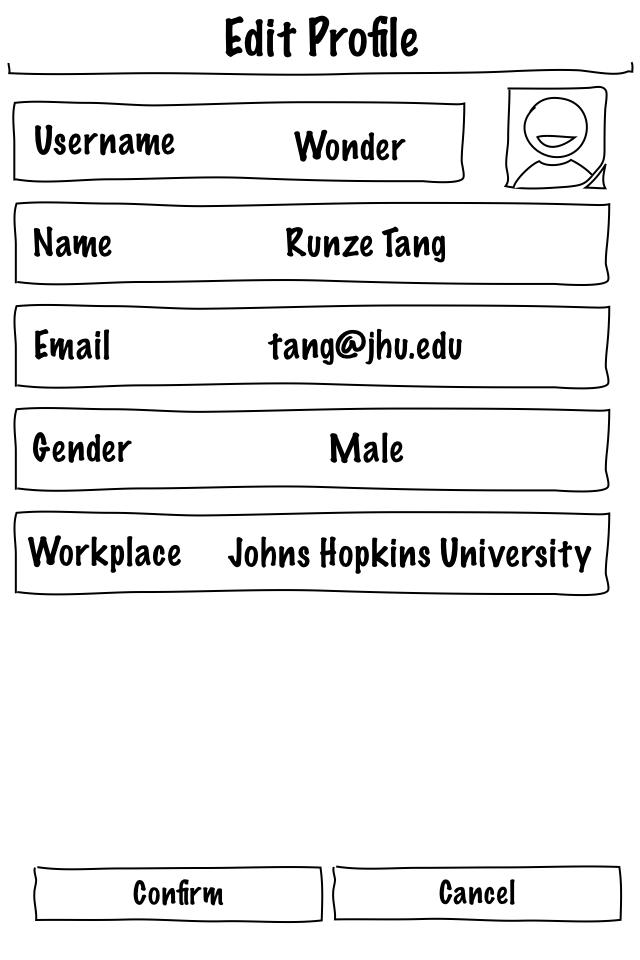
Filing in detailed account information
Primary Actor: User
Second Actor: Server
Goal: Acquire detailed User information
Pre-condition: User has entered the profile screen in the app
Main Path:
- User presses the word “Edit” in the upper right corner
- User types in username in the textbox labeled “Username”
- (Optional) User types in real name in textboxes labeled “Name”
- User types in email address in the textbox labeled “Email”
- (Optional) User presses the portrait logo
- (Optional) A window pops up showing “Take a photo new”, “Upload from my album” and “Cancel”
- (Optional) User takes a photo or chooses a photo from album
- (Optional) A confirmation window pops up to confirm chosen photo
- (Optional) User presses “Yes” to upload profile photo or presses “No” to go back to 6
- (Optional) User choose Male or Female in the textbox labeled “Gender”
- (Optional) User types in workplace in textboxes labeled “Workplace”
- User presses the button labeled “Confirm” to confirm changes made to the profile
- Detailed User information is updated in the server
- User presses the button labeled “Cancel” to cancel changes made to the profile
- User information is not changed in the server
Use-Cases Related to Setting Availability
Turn on availability status
Primary actor: user
Secondary actors: contacts
Goal: set the status to be "available"
Pre-Condition: user has logged in
Main Path:
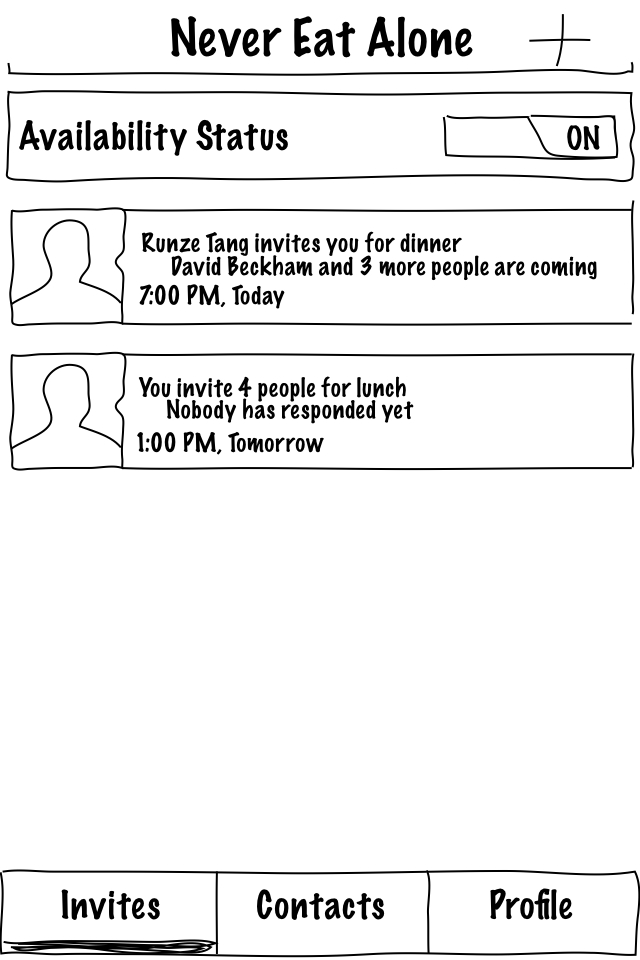
- On the “invites” page, user switches the Available Status button to “on”
- If one contact is in the Visibility List, the availability indicator of this user on that contact’s “Contacts” page turns on
- The profile page of the user on that contact’s interface shows "available"
Turn off availability status
Primary actor: user
Secondary actors: contacts
Goal: set the status to be "unavailable"
Pre-Condition: user has logged in
Main Path:
- On the “invites” page, user switches the Available Status button to “off”
- The availability indicator of this user on all contacts’ “Contacts” page turns off
- The profile page of the user on all contacts’ interface shows “unavailable"
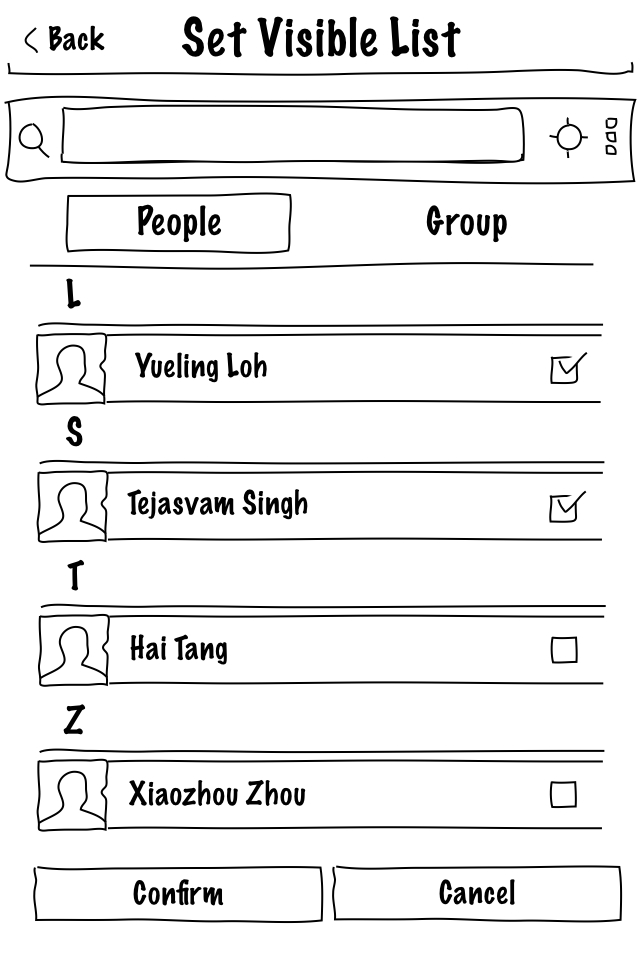
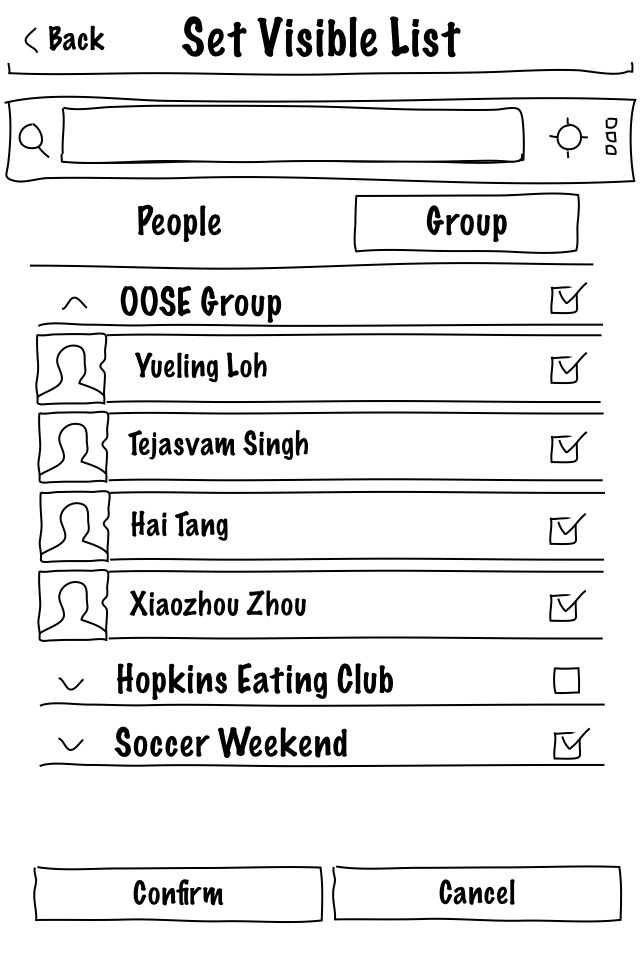
Set Visibility List
Primary actor: user
Secondary actors: contacts
Goal: set the Visibility List. Only the contacts in the list can see the user as available when user’s status is available
Pre-Condition: user has logged in and on the Profile page
Main Path:
- User pushes the “Contacts” button to enter the Contacts page
- User check or on check the box for “Set Visibility” on each line of the contacts
- If user’s availability status is currently on, the availability indicator of this user on the “Contacts” page of the chosen contacts turns on
- The profile of the user on the chosen contacts’ interface shows "available"
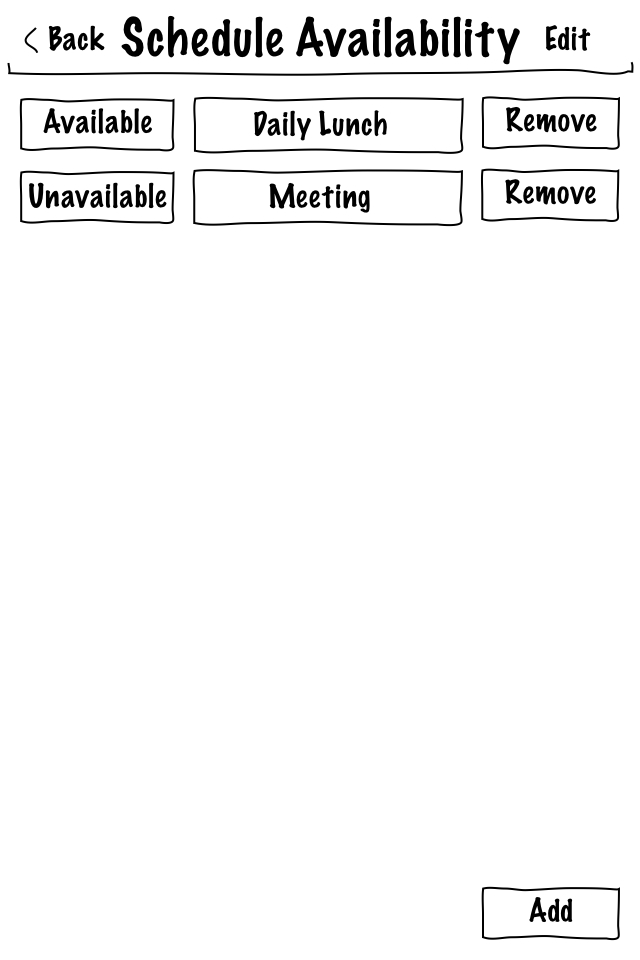
Schedule availability status
Primary actor: user
Secondary actors: friends
Goal: pre-set the availability status in fixed time slots
Pre-Condition: user has logged in
Main Path:
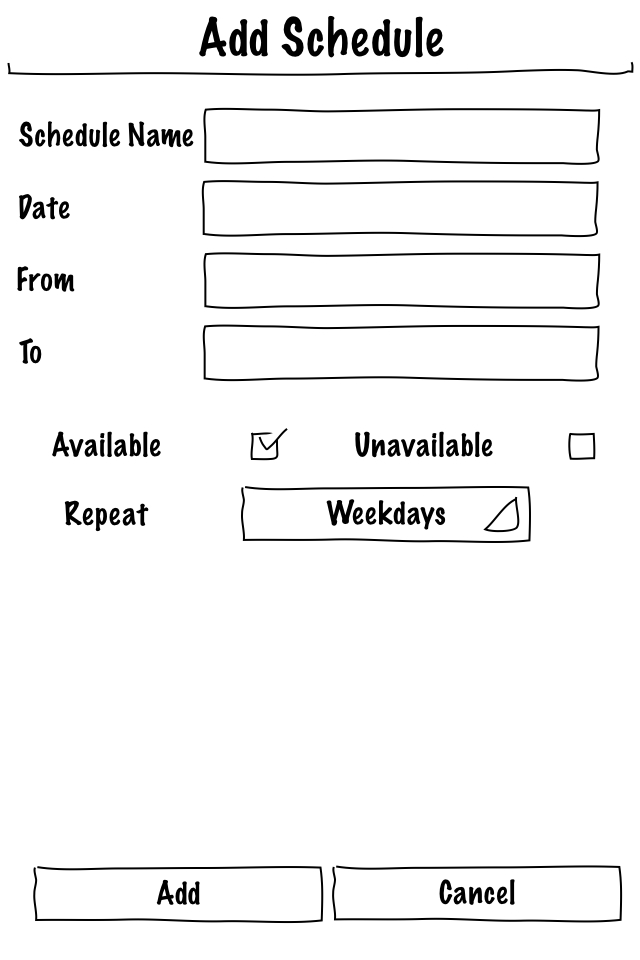
- User pushes the “Schedule Availability” button and enters the “Schedule Availability” page
- User pushes the “Add” button and enters the “Add Schedule” page
- User enters the date, starting(from) and ending(to) points of the time slot
- User pushes “Available” button
- User can choose repeat pattern
- User push “Accept” button
- User can push “Cancel” button to return to the “Schedule Availability” page without saving
- User return to the “Schedule Availability” page, an event label is created with “Available” and the time slot information
- When the time slot is reached, if one contact is in the Visibility List, the availability indicator of this user on that contact’s “Contacts” page turns on
- The profile page of the user on that contact’s interface shows "available"
- If the event is not repeating, the app deletes the event label automatically from the setting page of the user when availability time slot is passed
- User selects friends who will see his/her "unavailable" status
- User clicks the "set unavailable" button
- An event label is created with the time slot information
- When the time slot is reached, the availability indicators go off beside the friends name that are chosen
- And the profile of the user on the chosen friends interface shows "unavailable"
Delete a scheduled availability status
Primary actor: user
Secondary actors: friends
Goal: delete the availability status in fixed time slots
Pre-Condition: user has logged in and on the “Schedule Availability” page
Main Path:
- User pushes the “Edit” button
- A “Delete” button shows on each event label
- User click the “Delete" button on an event label
- A confirmation pops up
- User click the button to confirm the deletion
- User can click “cancel” and return to step 2
- The app deletes the event label from the setting page User click the "delete" button on the event label
Automatically turning off the availability status
Primary actor: user
Secondary actors: server, friends
Goal: turn off the available status of a user when the app is turned off
Main Path:
- User turns off the app
- The server set the user's status to be unavailable
- The availability indicator of this user on all contacts’ “Contacts” page turns off
- The profile of the user on all the contacts’ interface shows "unavailable"
Automatically turning on the availability status
Primary actor: user
Secondary actors: server, contacts
Goal: turn on the available status of a user when the app is turned on
Main Path:
- User turns on the app
- The server set the user's status to be available
- If one contact is in the Visibility List, the availability indicator of this user on that contact’s “Contacts” page turns on
- The profile page of the user on that contact’s interface shows "available"
Use-Cases Related to Posting and Responding to Meal Notifications
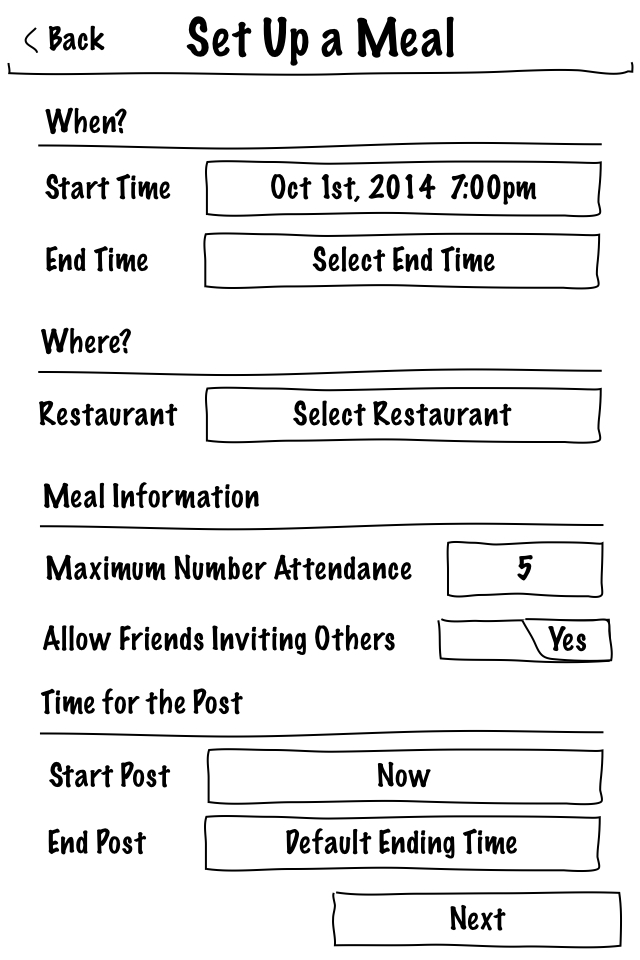
Create meal notification
Primary actor: poster
Goal: Create an invitation to be disseminated amongst friends
Pre-Condition: The poster has logged in
Main Path:
- The poster pushes a "create invitation" button
- The app will show a list of restaurants.
- The poster must select:
- One restaurant,
- Multiple restaurants, or
- Input new restaurant name
- The app displays the selected restaurant
- The poster selects the start time for availability to begin meal
- The poster selects the end time for availability to begin meal, or selects from a list of duration options (e.g. 30 mins, 1 hour, etc.)
- The poster selects the approximate meal duration selects from a list of duration options (e.g. 30 mins, 1 hour, etc.)
- The poster optionally sets a meet-up location
- The poster presses the “select friends” button to enter the next phase.
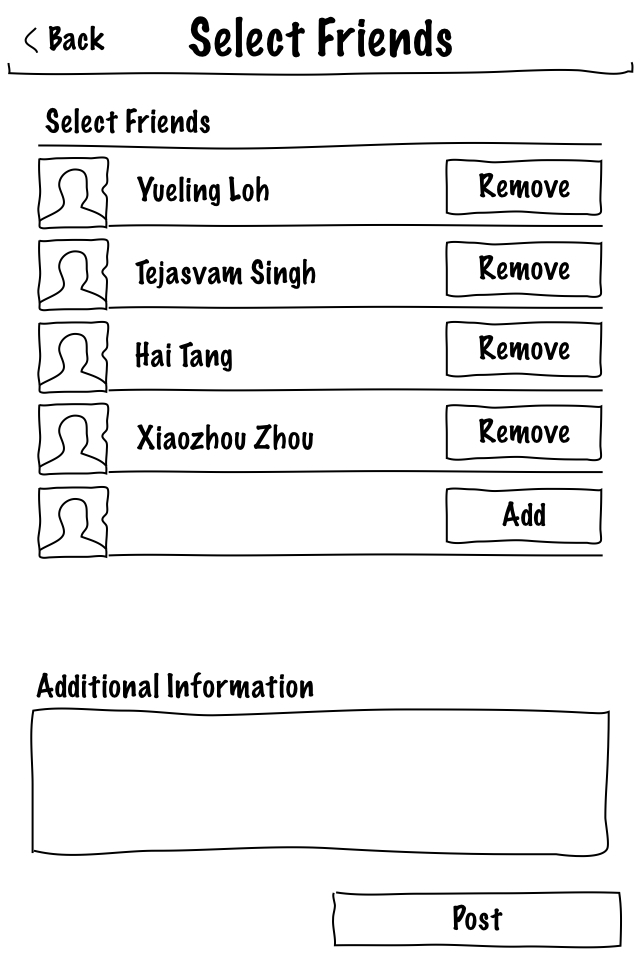
Select recipients for meal notification
Primary actor: poster
Goal: Select friends to which an invitation can be sent
Pre-Condition: The poster has created a meal invitation
Main Path:
- The poster pushes the “select friends” button
- The app shows a list of friends and preset friend groups
- The poster selects which friends and groups of friends will receive the invitation
- The app displays the list of selected friends to which the invitation will be sent
- The app has an option to save this set as a custom friends group or override an existing friends group
- The poster sets the maximum number of friend acceptance before the invitation is closed
- The poster sets if this meal notification is open to other parties (e.g. meal notification to extendable to friends of friends and no more)
- The poster presses the “complete post details” button to enter the next phase.
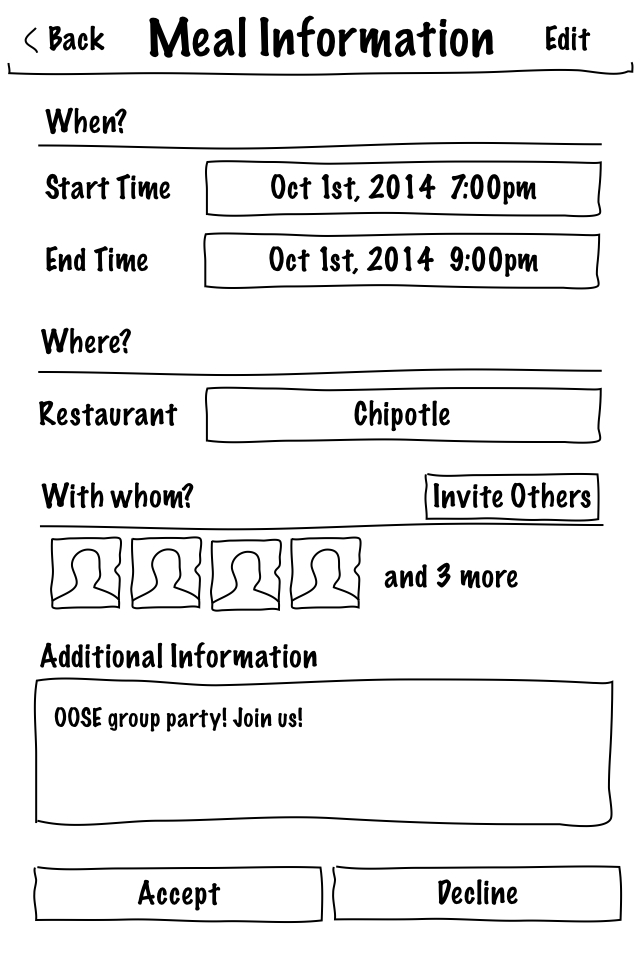
Post meal notification
Primary actor: poster
Goal: Post the meal notification to be seen by selected friends
Pre-Condition: The poster has created meal notification post and selected target friends
Main Path:
- The poster presses the “complete post details” button
- The poster selects a start time for meal notification post time (default is “now”).
- The poster can select an optional meal notification expiry time, or select from various options for meal notification durations (e.g. 30 mins, 1 hour, etc.)
- The app displays an option to save this meal notification under a name for future use
- If the poster types in a name for the meal notification and saves
- The app acknowledges the meal notification has been saved
- If the poster does not opt to save, then the meal notification will be stored as “current meal notification”
- The poster presses “post” button to post
Edit meal notification
Primary actor: poster
Goal: Edit an existing meal notification
Pre-Condition: poster has created at least one meal notification
Main Path:
- The poster pushes a "edit meal notification" button
- The app shows the current active meal notification (if available) and the list of saved meal notifications
- The poster selects which meal notification to edit
- The app returns the “create meal meal notification” page with fields filled
- The poster edits the fields and continues the process starting at the “create meal notification” page
- The poster saves the meal notification
- The poster can also post the meal notification
Delete meal notification
Primary actor: poster
Goal: Delete meal notification
Pre-Condition: poster has created at least one meal notification
Main Path:
- The poster pushes a "edit meal notification" button
- The app shows the current active meal notification (if available) and the list of saved meal notifications
- The poster selects which meal notification to delete
- The app deletes the meal notification and returns “meal notification deleted” message
Respond to meal notification
Primary actor: recipient
Secondary actor: poster
Goal: Respond to an meal notification
Pre-Condition: recipient has received an meal notification from a friend
Main Path:
- The recipient clicks on an active meal notification
- The recipient reads the information on the meal notification (see “notification”)
- The recipient can respond in one of the following cases:
- Decline the meal notification
- The app sends a decline to the inviter
- The app dismisses the meal notification from the recipient’s active meal notification list
- Ignore the meal notification
- The app dismisses the meal notification from the recipient’s active meal notification list
- Accept the meal notification
- If the inviter has set the meal notification to “open/extendable” and the maximum number of invitees has not been reached, the app displays a list of friends
- The recipient can select another friend (if that friend is a recipient of the app) or manually type in the name of the friend (This friend of friend is definitely going)
- The app sends the acceptance (with the numbers and names of accepted invitees) back to the inviter
Use-Cases Related to Push Notifications
Receive a Notification
Primary actor : recipient (user)
Secondary actor : Poster (user)
Precondition : Poster must have sent notification to recipient.Recipient must be available to Poster.
Goal : Display the notification on device
Main Path :
- Check if recipient is available to poster. If yes go to step 2 else go to step 3.
- Post the notification on the user's home screen. RETURN.
- Store the notification in the recipient's deffered notification list for push to recipient in case he/she becomes available before the notification expires.
Receive a Notification on Changing Availability Status
Primary actor : recipient (user)
Secondary actor : Poster (user)
Pre-Condition : Recipients deffered notification must be non-empty.
Goal : Display the notification(s) on device
Main Path :
- For each notification in the recipients deffered notification list, check If notification has not yet expired.
- If expired, delete notification else go to step 2.
- If recipient is available to poster of notification. If yes go to step 3 else go to step 4.
- Post the notification on the user's home screen. RETURN.
- Store the notification in the recipient's deffered notification list for push to recipient in case he/she becomes available before the notification expires.
Post a Capacity Update Notification
Primary actor : Poster (user)
Secondary actor : Recipient (user)
Pre-Condition : A recipient must have sent an acceptance notification to the poster.
Goal : Send a Capacity update to all recipients that are available to the poster.
Main Path:
- On recieving the acceptance notification, update the current capacity field in meal notification information. Go to step 2.
- Check if current capacity is less than maximum meal capacity. If so, go to step 3 else go to step 4.
- Send a capacity update notification consisting of updated meal notification information to each recipient of the original meal notification. RETURN.
- Close meal notification and send completion notification to all recipients of original notification.
Post an Update Notification
Primary actor : Poster (user)
secondar actor : Recipient (user)
Pre-Condition : Poster must have already sent a notification to recipients that is currently active.
Goal : Send updated notifcation to the recipients
Main Path:
- Update the relevant meal notification information fields
- Check if meal constraints are still unsatisified. If so, go to 3 else RETURN.
- Send an update notfication consisting of the updated meal notification information to all recipients of the original meal notification. RETURN.
Post a Friend Attending Notification
Primary actor : Poster (user)
Secondary actor : Recipient (user)
Pre-Condition : A recipient must have sent an acceptance notification to the poster.
Goal : Inform all other recipients who are contacts of the recipient that accepted the notification that given recipient is attending.
Main Path :
- Construct a friend attending notification.
- For all recipients R of the original meal notification that are contacts of the recipient that accepted the notification, send the friend attending notification to R.
Post a Completion Notification
Primary Actor : Poster (user)
Secondary actor(s) : Recipient (user)
Pre-Condition : Meal notification constraints must be satisified.
Goal : Send a Completion Notification to all recipients that are available to the poster.
Main Path :
- Close the meal notification.
- Send a completion notification to all recipients that are available to the poster.
Post a Cancellation Notification
Primary Actor : Poster (user)
Secondary Actor(s) : Recipient(s) (users)
Pre-Condition : The poster must have pushed a meal notification to recipients which is currently active ( i.e. not expired)
Goal : Cancel the posted meal notification.
Main Path :
- Post a cancellation message to all recipients of the original meal notification.
Send a Contact Request Notification
----------------------------------------
Primary Actor : Poster (user)
Secondary Actor(s) : Recipient (users)
Precondition : The poster must have added the recipeient as a contact.
Goal : Send a Contact Request.
Main Path :
1. Send the Contact Request Notification.
Recieve a Contact Accept Notification
------------------------------------------
Primary Actor : Poster (user)
Secondary Actor(s) : Recipient (users)
Precondition : The poster must have added the recipeient as a contact. The contact must have accepted the Contact Request Notifcation and sent the Contact Accept Notification.
Goal : Recieve A Contact Accept Notification.
Main Path :
1. If Contact Request Notifcation is still active then go to step 2 else RETURN.
2. Recieve the Contact Accept Notification.RETURN,
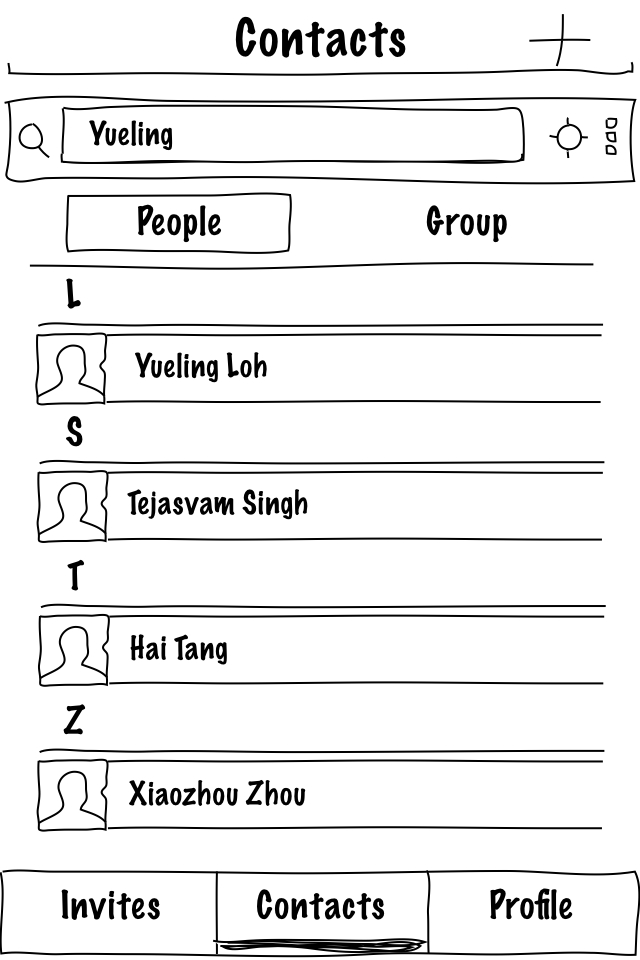
Use-Cases for Contact Management
Use Case to Add a Contact
Primary actor: user
Goal: Add a contact to the user's list of contacts
Pre-Condition: user has logged in. Contact must be a valid user of the application.
Main Path:
- Go to the contacts page
- Select the "people" tab
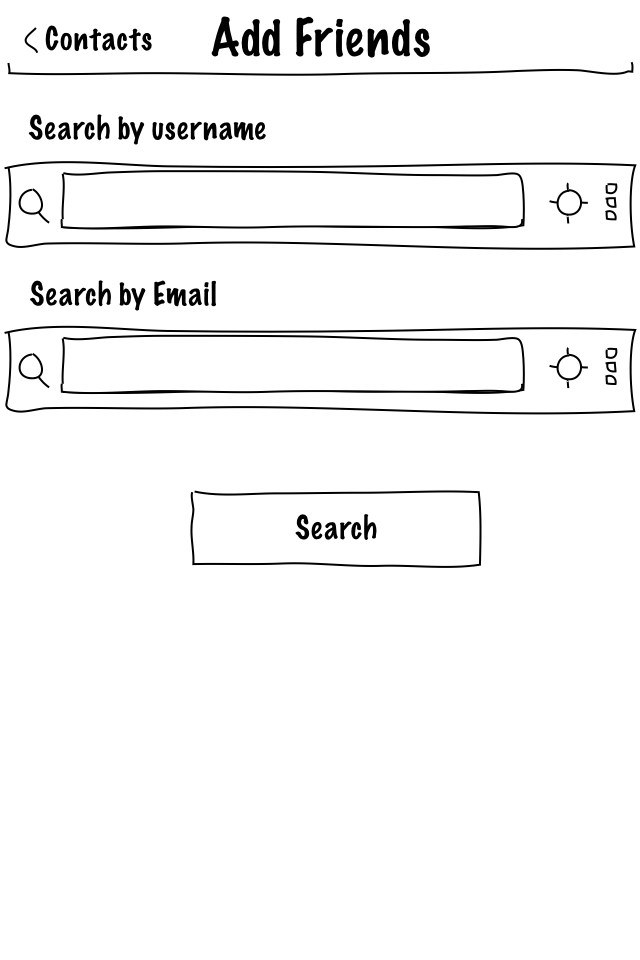
- Press the "add contact" button.
- On "Add page button" select "search by username".
- Type in contact's username.
- Press search button
- Select right contact from search results.
- Press "confirm" button.
- An Add Contact Notification is sent to contact. If the contact sends an accept contact invitation back then contact is added to contact list.
- Go to the contacts page
- Select the people tab
- Press the "add contact" button.
- On "Add page button" select "search by email".
- Type in contact's email.
- Press search button
- Select right contact from search results.
- Press "confirm" button.
- An Add Contact Notification is sent to contact. If the contact sends an accept contact invitation back then contact is added to contact list.
Use Case to Delete a Contact
Primary actor: user
Goal: Delete a contact from the user's list of contacts
Pre-Condition: user has logged in. Contact must be a valid user of the application. Contact must be present in the user's contact list.
Main Path:
- Go to the contacts page
- Select the "people" tab
- Search for contact to be deleted.
- Swipe sideways. Delete and edit appear.
- Hit delete button.
- On the prompt that appears, press "confirm".
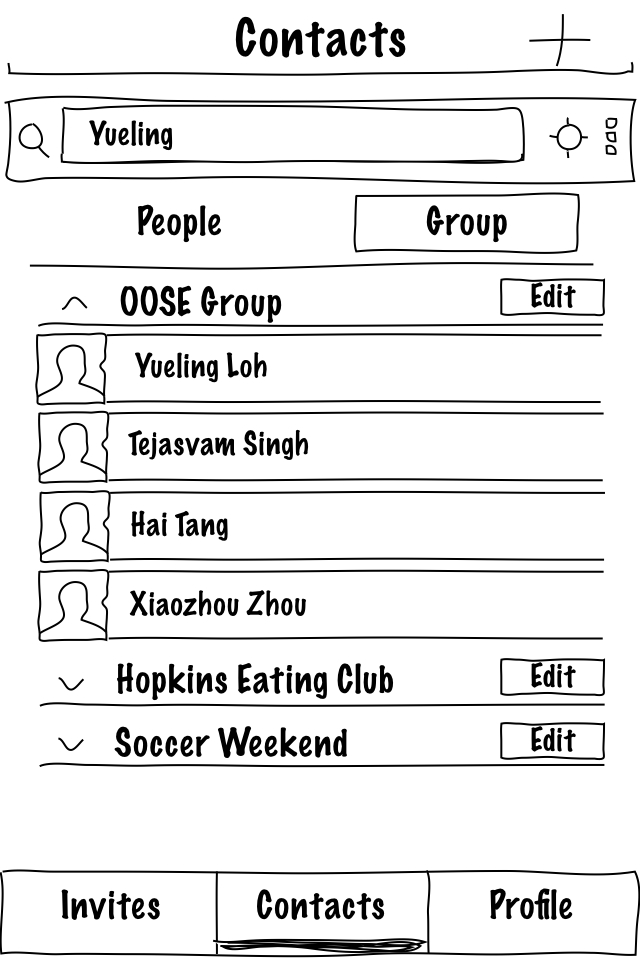
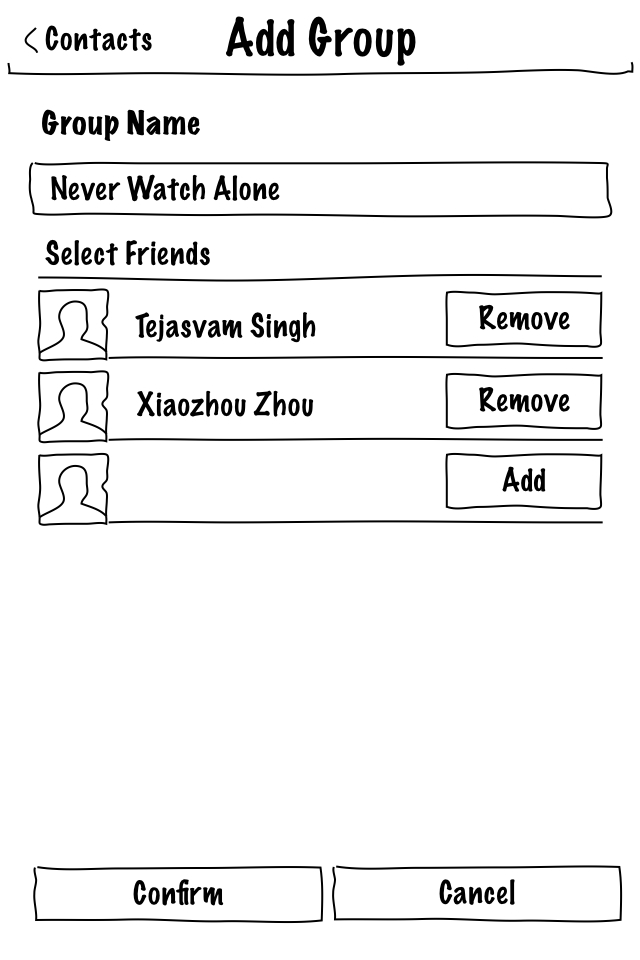
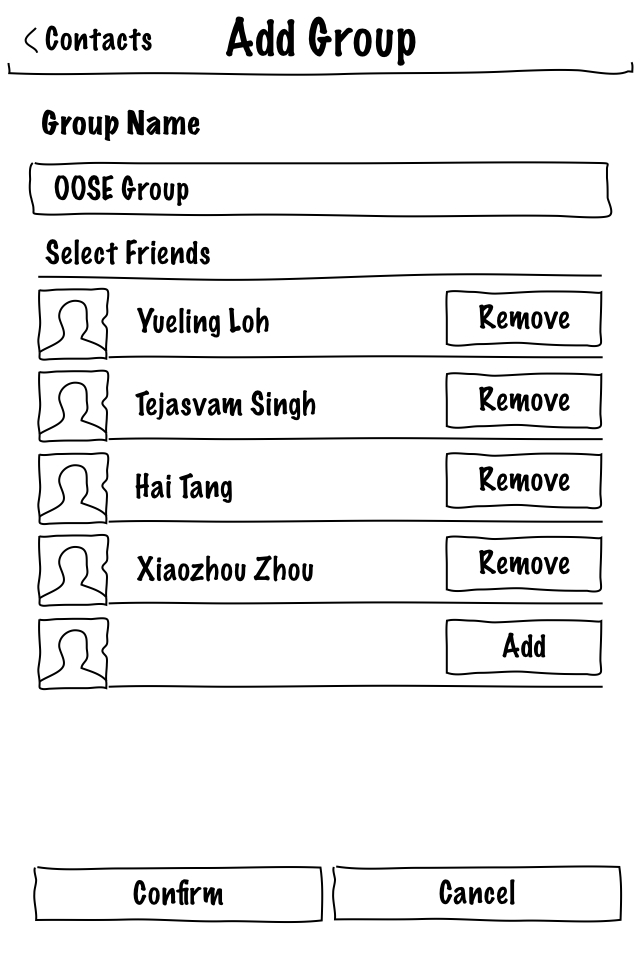
Use Case to Create Groups
Primary actor: user
Goal: Delete a contact from the user's list of contacts
Pre-Condition: user has logged in. Contact must be a valid user of the application. Contact must be present in the user's contact list.
Main Path:
- Go to the contacts page
- Select "group" tab.
- Click the "add group" (+) button.
- Type group name in the "Group Name" textbox.
- Select contacts from the "Select Friends" list.
- Hit Confirm.
Use Case to Delete Groups
Primary actor: user
Goal: Delete a group from the user's list of contact groups
Pre-Condition: user has logged in. group must be present in the user's contact groups.
Main Path:
- Go to the contacts page
- Select the "group" tab
- Search for group to be deleted.
- Swipe sideways. Delete and edit appear.
- Hit delete button.
- On the prompt that appears, press "confirm"
Use Case to Edit A Contact's Details
Primary actor: user
Goal: Edit contact information for a contact in the user's contact list.
Pre-Condition: user has logged in. Contact must be a valid user of the application. Contact must be present in the user's contact list.
Main Path:
- Go to the contacts page
- Select the "people" tab
- Search for contact to be edited.
- Swipe sideways. Delete and edit appear.
- Hit edit button.
- Make the requisite changes.
- Press "confirm"
Use Case to Edit A Group's Details
Primary actor: user
Goal: Edit group information for a group in the user's contact list.
Pre-Condition: user has logged in. Group must be present in the user's contact list.
Main Path:
- Go to the contacts page
- Select the "group" tab
- Search for contact to be edited.
- Swipe sideways. Delete and edit appear.
- Hit edit button.
- Make the requisite changes.
- Press "confirm"
UML Activity Diagram

Architecture
- Client: Android SDK
- Server: J2EE
- Graph database: Neo4j
- Language: Java
- IDE: Eclipse
- Graph Database: Neo4j
- Libraries: JDBC,
Hibernate
- Development Target Platform : Android (possibly cross platform with iOS using RoboVM)
- Geolocation: Google Maps Geolocation API