RESTful Web Services in Java
RESTful Web Services: generalizing http(s)
- Most modern phone and web apps have a RESTful service in the background controlling all the underlying business logic: its the "brains"
- A basic RESTful server example: a shopping cart web service with endpoints (explicit interfaces) for adding an item to cart, listing contents, deleting an item, checking out, etc.
- a RESTful web service runs over the standard http(s) web protocol like a web server
- But use http as an arbitrary interface: send arbitrary requests (not just requests for webpage html/css/images), return arbitrary results (not just html/css/etc).
- "REST" stands for something but think of the server "at rest" until a request comes in from the phone app or browser JavaScript code.
- The key to a good RESTful protocol is a clear specification of the requests allowed and responses expected.
Review: HTTP
Here is a super-quick review of the http Internet protocol on top of which REST runs.- A webserver / RESTful server is nothing but a process repeately listening for connections on a TCP/IP port (usually 80 for http and 443 for https).
- A browser / RESTful client is opening connections and sending requests.
- Lets show the nitty gritty using a browser connecting to our terminal: we will be the "web server", manually typing replies.
- Fire up the "server" via this Mac/Linux console command:
while true; do nc -l 8008; done
-- tell console to keep listening on port 8008 and we can see requests and type replies; uses nc (netcat) command - Open a browser and enter URL http://localhost:8008 (as you probably know, localhost is your own computer)
- We will see in the terminal what string the browser actually sent-- something like
GET / HTTP/1.1
Host: localhost:8008
...
Connection: keep-alive
- We can then reply: for example, type into the terminal (terminating all input with control-D, and putting a blank line between the OK and the reponse)
HTTP/1.1 200 OK

Welcome to OOSE
which will then display "Welcome to OOSE" in the browser page (the first line is the reply header, the rest is the data which is the reply.) - For web the reply is an http/css/etc string, but for a RESTful server it is usually a JSON string (more on that soon).
- Fire up the "server" via this Mac/Linux console command:
- If you want to pretend to be a browser or RESTful client, the command nc -c pl.cs.jhu.edu 80 will open a connection to the course web server. Then, typing in
GET /oose/lectures/webjava.shtml HTTP/1.1
Host:pl.cs.jhu.edu
for example will request this webpage and the reply will be the raw html.
HTML / REST request types ("methods")
HTTP methods are included in every request indicating type; REST re-uses these same types- GET - get some data (the most common type -- see use in example above)
- POST - put up new data
- PATCH - update data
- PUT - update or overwrite data
- DELETE - delete data
- plus other less common ones.
Request/response general format
-
A given http server request
- is initiated by opening a network socket to e.g.
pl.cs.jhu.eduport 80, the default http server port - includes various header info
- includes the request type (GET/POST/etc) at a URL (e.g.
GET /oose/index.shtml HTTP/1.0) - PLUS an arbitrary string argument (the body, where REST protocols may put a JSON string for parameter data)
- is initiated by opening a network socket to e.g.
- The server then returns a response which includes
- Header info including the status code
- 200 OK is the HTTP code meaning all went well (we used it in example above),
- 4XX for various error types
- Plus many more; do try to use the most reasonable code for your response
- an arbitrary body; it may be the html for a webpage, JSON string data for a RESTful server response, a .jpg image binary, etc.
- Header info including the status code
Basic properties of REST
- There should be a very clear request/response protocol defined independent of the implementation
- Design Principle behind REST: program to interfaces, not implementations
- Data format for request and response today is the JSON standard --
{"msg" : "Hi I am a JSON string; its not a coincidence that I look like JavaScript syntax", "priority" : "Low"} - It is stateless: Don't assume the server knows anything about your state, pass any state info as parameters
Example: the To Do RESTful server and app
We will experiment with RESTful HTTP on a simple To Do web app (git sources) / (deployed on Heroku), using Postman to directly send RESTful API requests.
- We will informally experiment with the To Do app by sending it some requests defined in the Postman collection (library) To Do Experiments in the docs/ folder of the To Do app -- download and import this file into Postman.
- Example: a GET on localhost:7000/items returns a JSON object listing all the current To Do items. Each item has a unique id and a description field.
- See the Postman Experiments file for more simple examples.
- Manual invocation is also possible using the terminal, nc -c localhost 7000:
PUT /items/3 HTTP/1.1
content-type: application/json
host: localhost:7000
content-length: 37

{ "description": "3rd item change!"}
(the additional header fields are required by the Jetty server we are using)
Aside: Resource/route/endpoint terminology
- A resource is a particular data item to be accessed by REST (e.g. to do items).
- A route is a URL suffix to address the resource needed, e.g.
/item/5to refer to the todo item with id 5 - An endpoint is a route plus an HTTP method (GET/PUT/DELETE/...)
The endpoints for the todo app (i.e., its RESTful interface)
- To be 100% clear about the request/response format of the endpoints supported by our API, we need to write a precise specification (program to interfaces again).
- An excellent industry example of endpoint documentation: Spotify
- For the To Do app (and for homework 1 where you implement your own RESTful server) we use Postman to specify the API and also include automated tests of the API in the spec for added benefit.
- The To Do docs directory contains the Postman API specification, import it into Postman.
- We will go through parts of this specification in lecture.
Clients (users) of a RESTFUL server
- Clients can be browsers (using JavaScript to send RESTful requests), phone apps, other servers, iOT devices, etc.
- We will very briefly look at the To Do RESTful protocol client, the code in the browser.
- In a future lecture we will cover JavaScript front-ends in detail
Under the hood of the RESTful server
- RESTful GET/POST/ETC requests come in to the web server and need to be dispatched/routed to Java code to run - how?
- Answer: use a RESTful server framework! We use Javalin for the To Do app, a simple but effective framework.
Javalin
- Inspired by Ruby's Sinatra and also similar to Python's Flask
- Part of a new industry Microservices trend to use small RESTful servers for each distinct task.
- Microservers are much simpler than the old heavyweights (Spring, Tomcat, Django, Rails, etc) so are better for learning the fundamentals.
- For your projects the happy path is Javalin, and a somewhat happy path is Flask, another microserver
— "learn the protocol, don't just learn how to plug into a framework". - Javalin is just a Java package so no need to install anything, just add the Maven dependency
- When you run your app that uses Javalin it will fire up a Java-based web server (Java Jetty) automatically for you
- The Javalin documentation shows how simple it is - its just one webpage!
- We will inspect the code in lecture using IntelliJ.
Javalin Todo app classes
Server- the main class which sets up the database and endpointsItem- a "model" class, the regular Java class ("POJO") for a single To Do entry is the only model class hereItemsController- "controller" means dealing with input; this key class contains the code handling the different routes/endpointsItemsRepository- front-end to the database, implements add/remove/etc
-- could have had this code in Controller but remember separation of concerns!Server's.routes(..)method takes a 0-argument function as parameter which sets up all the routes
-- specify what controller action to do when a particular route is requested
We will look at this .routes(..) method in detail. Static methods get(...) etc in routes(..) add handlers to the routing table, "plugging in" the route handling methods of the ItemsController class. The .path adds more characters to the route.
Observe that Javalin uses method chaining to allow for compact configuration of the server.
Here is a simple picture summarizing the To Do server architecture:
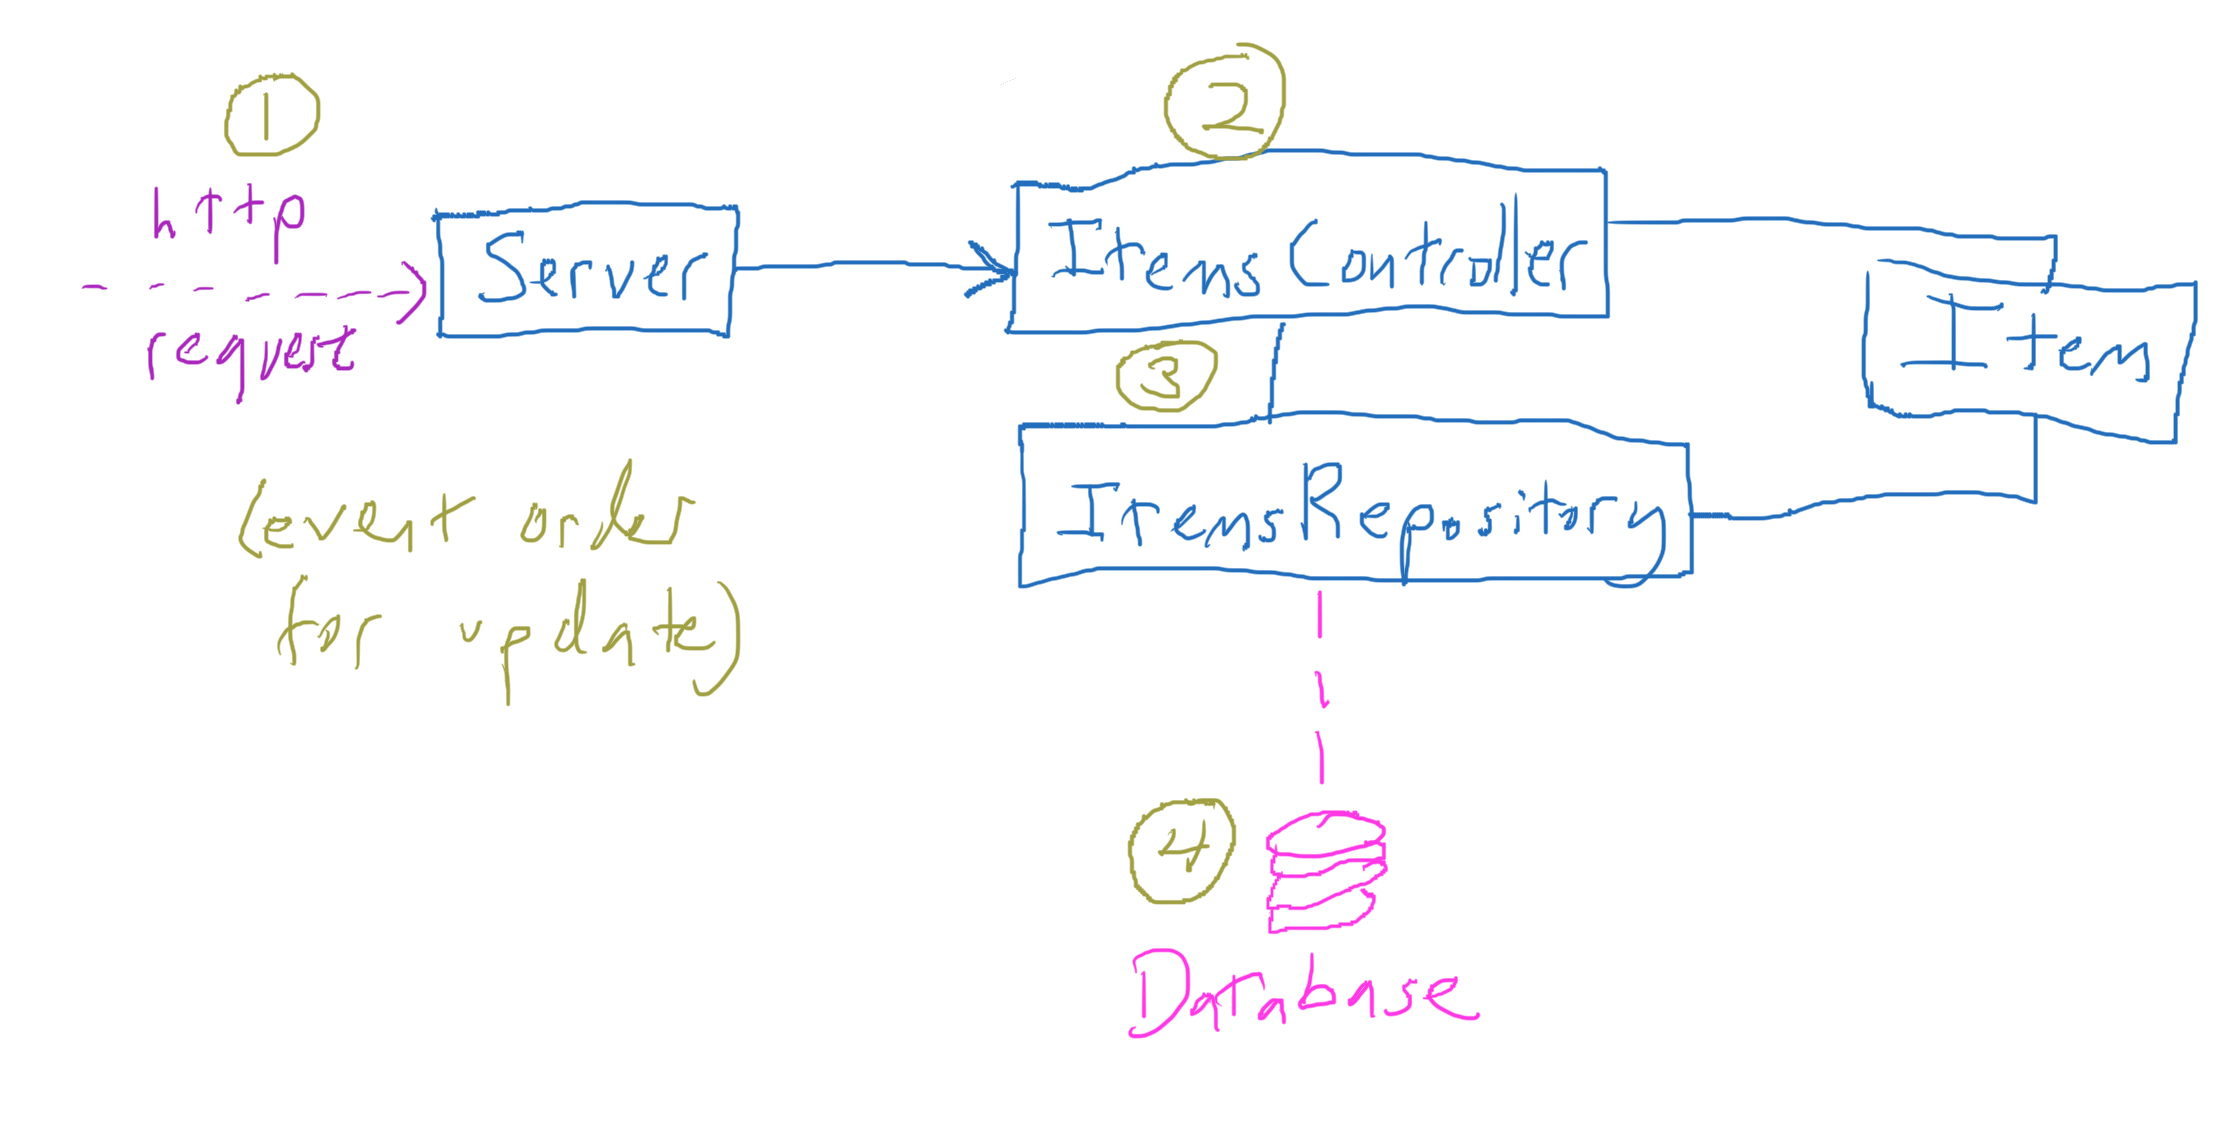
Observe the http routes/endpoints are insulated from the ItemXX classes, and how the database is insulated from all classes except for ItemsRepository: separation of concerns!
The Java Model on the server: the Item class
- The core of the server is regular Java objects (POJO's, Plain Old Java Objects) for modeling the domain at hand
- The Java model code should not itself be concerned with persisting data or making JSON for the browser
-- keep a clear separation of concerns - The
Itemclass is the only model class in this simple example, representing a single todo entry- In a larger app there will be many such classes
- Also, any underyling operations on this data should be methods on these model classes
The Persistence layer
This term refers to the database on the back-end - nearly all web services are serving persistent data from some kind of database.
- Since the data is in a database on a storage device, the server can crash and no data is lost.
- The Todo app uses SQLite locally, it is a very lightweight database which works great for small projects
- Postgres is a more industrial database and is the happy path database for projects; the To Do app deployed on Heroku uses Postres.
- "NoSql" databases such as Mongo don't store databases in tables - a relatively recent trend
If you run the Todo app, a file to-do.db is created which contains the SQLite database. We will inspect that file in class using the IntelliJ database browser.
Mapping between three data representations: JSON ↔ Java object ↔ database row
- We have created a little problem, there are three different representations of the same data that need to be connected
- This is a classic issue in web and phone apps
- To divide and conquer this problem, make two independent mappings
- JSON ↔ Java object
- Java object ↔ database table row
- You might be tempted to short-circuit all these representations, but even though its a bit of a pain it separates concerns very well and leads to more robust code -- make sure you do this in your projects!
The JSON - Java object bidirectional mapping
- Just do the data conversion: map each JSON field to a Java object field
- There are fortunately libraries to help, e.g. Jackson can automatically map field ↔ field in both directions.
The Todo app makes several uses of Jackson to both extract and encode data in JSON - itemParameter.get("description").asText() to extract from JSON and ctx.json(Server.getItemsRepository().getItems()) to encode
The Java object - database bidirectional mapping
There are two schools of thought here- "ORM" (Object relational mapping)
- This generally means there is some framework doing an automatic conversion between Java objects and database table rows.
- Hibernate is most widely used Java ORM, it implements the JPA standard
- Its a lot of work to set up but then things work "magically"
- Buuuuuut, when the magic breaks its hard for the non-expert to fix it
- "POJO" (Plain old Java Object)
- Don't use a mapping framework, just map manually.
- This used to be hard but new syntax and libraries make it relatively easier
- You need to manually invoke SQL queries to read from/to the DB, its a little bit but not too much pain.
- This is the OOSE happy path and what the To Do app does; you will learn whats really happening and not have to see through magic.
In the todo app the ItemsRepository class oversees the object -- database mappings.
Appendix: Maven
Maven is the modern way to build a Java project. Gradle is similar to Maven, Android uses Gradle.
- Like a makefile's targets, you can define Maven phases for different lifecycle functions in the Maven pom.xml configuration file
- clean
- validate - make sure you have all required packages etc.
- compile
- test
- package - put all into a standalone Jar file
- install
- site - generate documentation
- deploy - e.g. deploy to Heroku
- You can easily declare dependencies, packages you depend on
- and the reaallllly cool part is all you have to do is put in the name/version in the pom.xml and Maven will download the jars for you - Maven plugins are extensions with a similarly easy auto-download method
- Key to projects: share a Maven build file and your team will automatically be using identical versions of libraries etc - minimize platform-specific bugs.
- We are going to require a proper pom.xml file for projects and Assignment 1 with all dependencies declared
We will inspect the To Do example app pom.xml file and build some of the other lifecycle phases
See the Tools page Maven entry for more information.
Appendix: Assignment 1
We will briefly review the RESTful server assignment.